Getting Started with the ShutterTime iOS App
Mobile-app Beginner
ShutterTime is your personal photography weather assistant — built to help you find the perfect moment to capture. Whether you're chasing golden hour...
9 min read
Published February 20, 2026
ShutterTime is your personal photography weather assistant — built to help you find the perfect moment to capture. Whether you're chasing golden hour at the coast, waiting for the Milky Way to peek through, or hoping for moody fog in the forest, ShutterTime keeps an eye on the conditions so you don't have to.
This guide will walk you through everything you need to know to get started with the iOS app. We'll cover signing in, setting up your home base, exploring your dashboard, and making the most of features like location scoring, photo session planning, and community packs.
Note: ShutterTime is currently available on iOS, with an Android version coming soon. Stay tuned!
Download and Sign In
You'll find ShutterTime on the App Store. Once installed, open the app and you'll be greeted by the sign-in screen.

You have three ways to sign in:
- Sign in with Apple — the quickest option if you're on iOS
- Sign in with Google — great if you prefer your Google account
- Sign in with email — use your email address and password
If you don't have an account yet, tap Sign Up at the bottom of the screen. You'll just need your name, email, and a password to get going.
Your First Steps — The Onboarding Wizard
The first time you sign in, ShutterTime walks you through a friendly setup wizard to personalise your experience. It only takes a minute or two, and it makes a real difference to the recommendations you'll get.
Welcome Screen
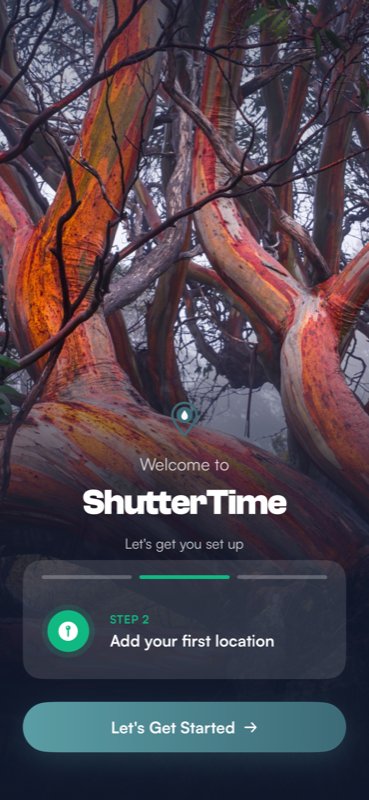
You'll be greeted by a warm welcome with a gorgeous full-screen nature backdrop. An animated preview cycles through the setup steps ahead — setting up your home base, adding your first location, and discovering community packs. Tap Let's Get Started to begin.
Why Set a Home Base?
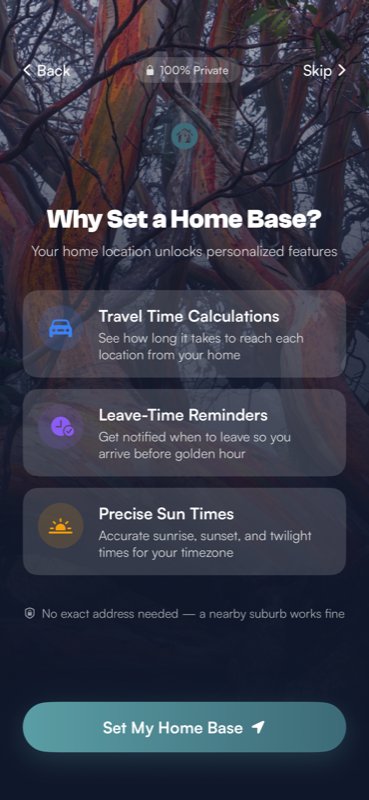
Before you drop a pin, ShutterTime explains why your home base matters. Three clear benefit cards show what it unlocks:
- Travel Time Calculations — see how long it takes to reach each location from your home
- Leave-Time Reminders — get notified when to leave so you arrive before golden hour
- Precise Sun Times — accurate sunrise, sunset, and twilight times for your timezone
Notice the privacy badge at the top — 100% Private. No exact address is needed; a nearby suburb works perfectly fine. Tap Set My Home Base to continue.
Set Your Home Base
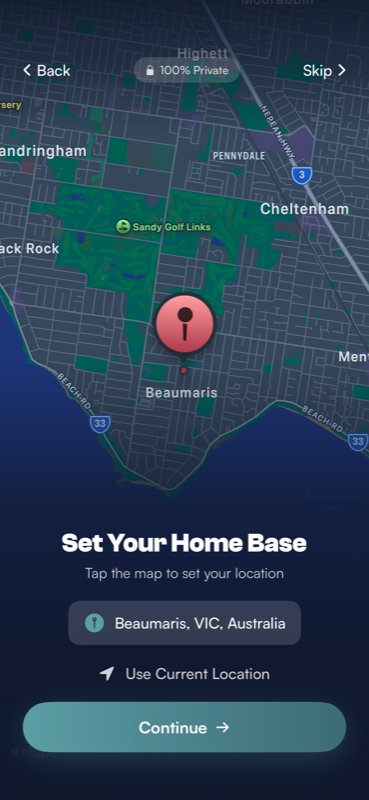
A full-screen dark-themed map appears. Tap anywhere on the map to drop a pin near where you live, or use Use Current Location to set it automatically. You'll see the resolved location name appear below the map. Tap Continue when you're happy with the spot.
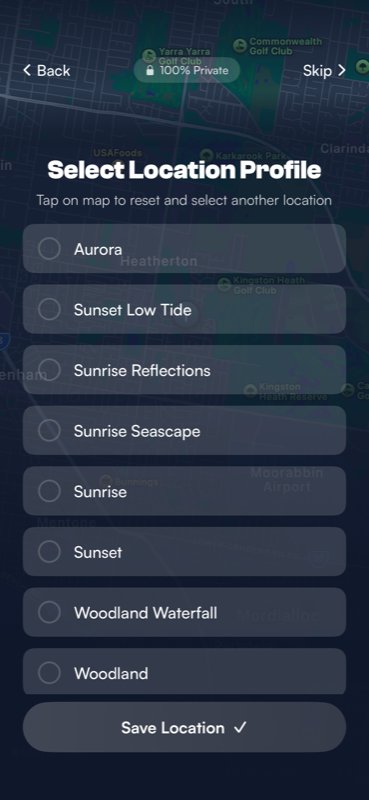
Add Your First Location
Now for the fun part — adding your first photography spot! After tapping the map to place your pin, a profile selector slides up with a heading Select Location Profile. Choose one or more photography profiles that match the kind of shooting you do at this spot — options like Aurora, Sunset Low Tide, Sunrise Reflections, Sunrise Seascape, and more. Tap Save Location and you're set.
How It All Works
Before you dive in, ShutterTime gives you a beautiful animated walkthrough of its core loop. It cycles through three steps automatically:
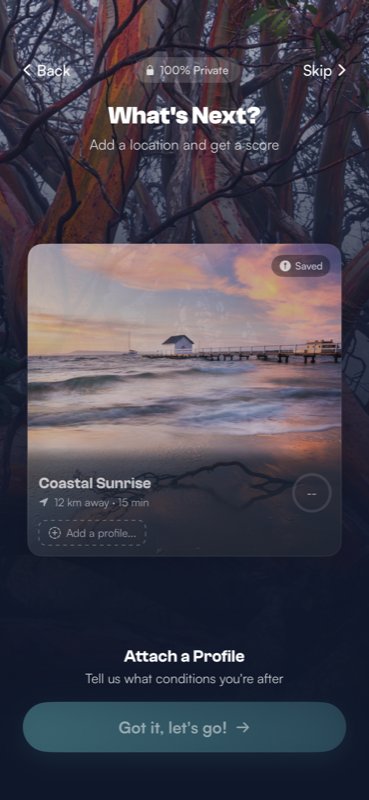
Step 2 — Attach a Profile: A gorgeous location card appears for "Coastal Sunrise" with a dashed "Add a profile..." prompt, showing how profiles connect to your locations.
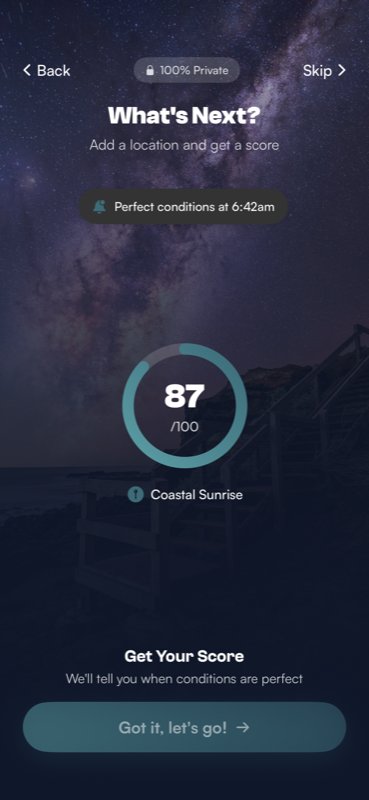
Step 3 — Get Your Score: An animated score ring fills to 87/100 against a stunning Milky Way backdrop. A notification banner reads "Perfect conditions at 6:42am" — showing exactly how ShutterTime keeps you in the loop. Tap Got it, let's go! to continue.
Discover Community Locations
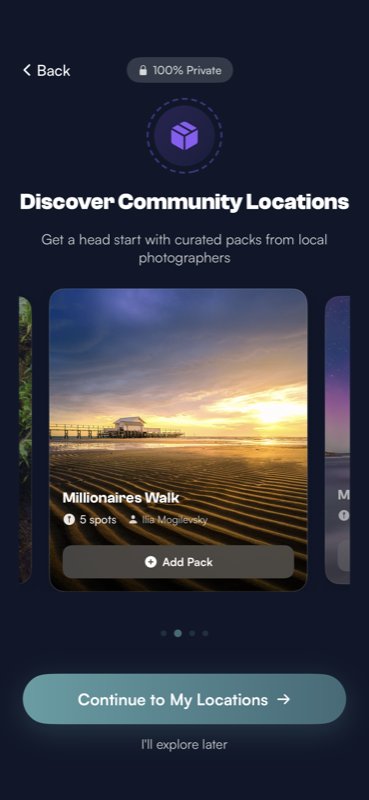
The final onboarding step introduces you to community location packs — curated collections of photography spots shared by other photographers in your area. You'll see a swipeable carousel of packs with cover photos, spot counts, and an Add Pack button to install them instantly.
You can install packs right away or tap I'll explore later to skip ahead. Tap Continue to My Locations when you're ready to start exploring.
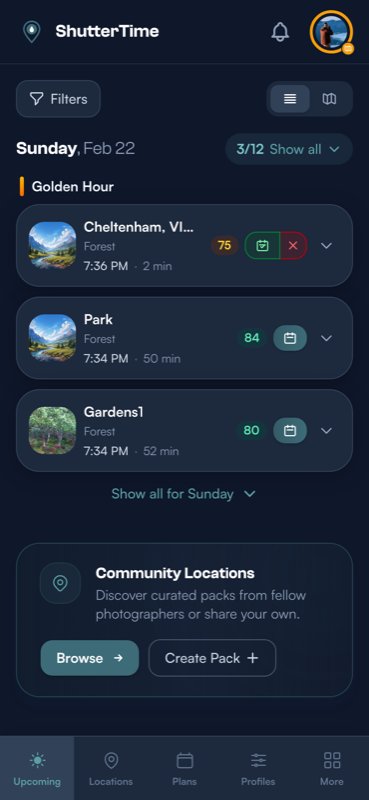
Your Dashboard — Upcoming Opportunities
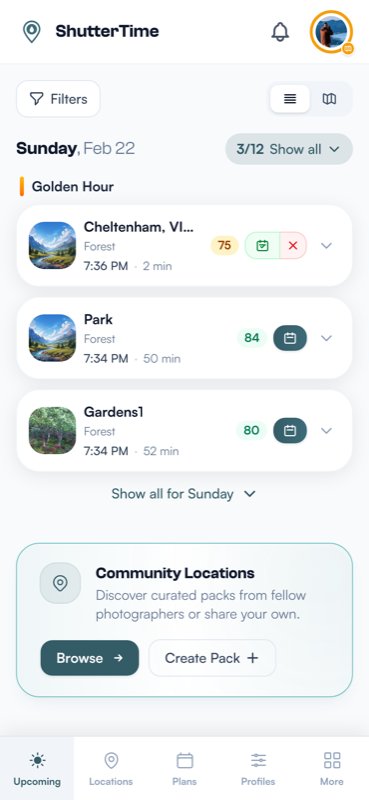
The Upcoming tab is your home base inside the app. It shows you a timeline of photography opportunities across all your saved locations, grouped by date and sun phase (like Golden Hour or Astronomical Twilight).
Each opportunity card shows:
- The location name and attached profile
- A condition score from 0 to 100 — the higher, the better the conditions
- The time the phase starts and how far away the location is
Scores are colour-coded so you can spot the best conditions at a glance: green (90+) means exceptional, teal (80–89) is great, amber (70–79) is decent, and grey (below 70) means conditions aren't ideal.
You can filter opportunities by profile, location, or minimum score using the Filters button at the top.
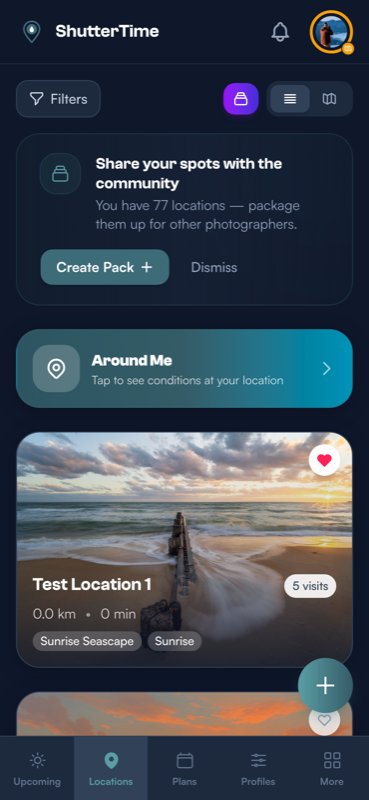
Managing Your Locations

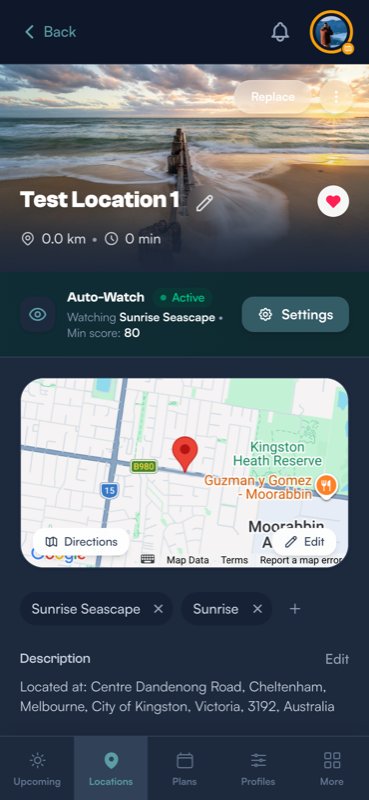
The Locations tab is where all your saved spots live. Each location card shows a cover photo, the distance from your home base, and which photography profiles are attached.
Tap the Around Me banner to quickly see what conditions are like at spots near your current position — handy when you're out and about with your camera.
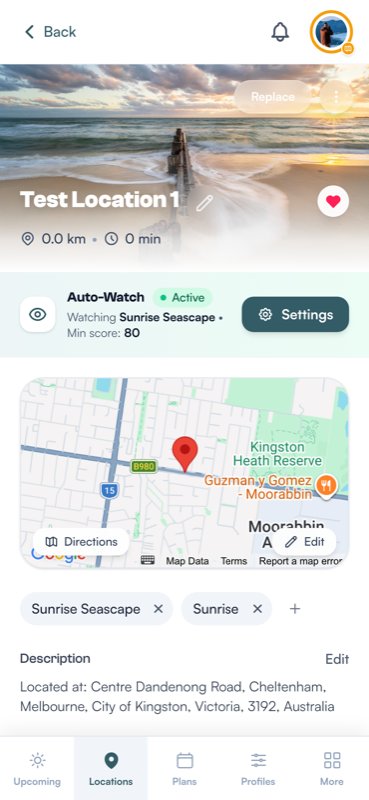
Tap into any location to see the full detail view. Here you'll find:
- A map showing the exact pin location
- Attached profiles — the photography styles being scored for this spot
- Auto-Watch — set a minimum score and get notified automatically when conditions are right
- A detailed conditions timeline showing scores for every sun phase over the coming days
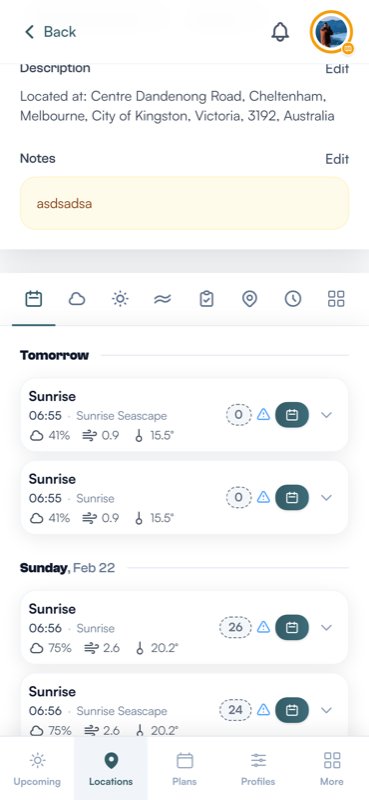
The conditions timeline is where the magic happens. ShutterTime analyses weather forecasts, cloud cover, wind, temperature, tides, and astronomical data to give each sun phase a score. Scroll through to find the perfect window for your next shoot.
Photography Profiles
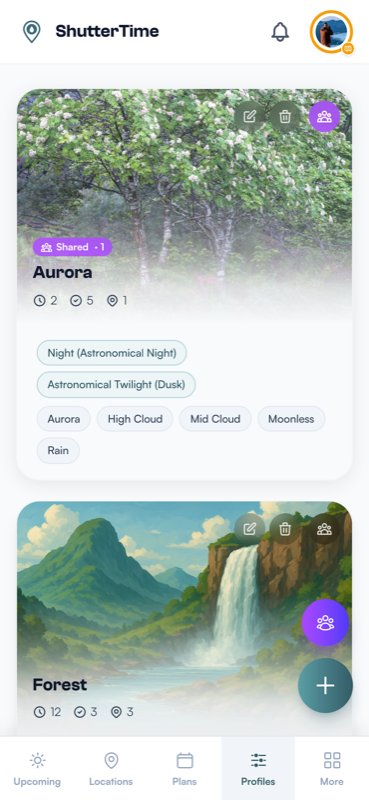
Profiles are at the heart of how ShutterTime scores conditions. Each profile represents a photography style — like Aurora, Forest, Sunrise Seascape, or Astrophotography — and defines the ideal conditions for that style.
For example, an Aurora profile might prioritise clear skies, high KP index, and astronomical darkness. A Forest profile might look for overcast conditions, light rain, and soft morning light.
You can:
- Browse and install community profiles created by other photographers
- Create your own custom profiles with exactly the conditions you want
- Attach profiles to any of your locations to start getting scores
Planning a Photo Session
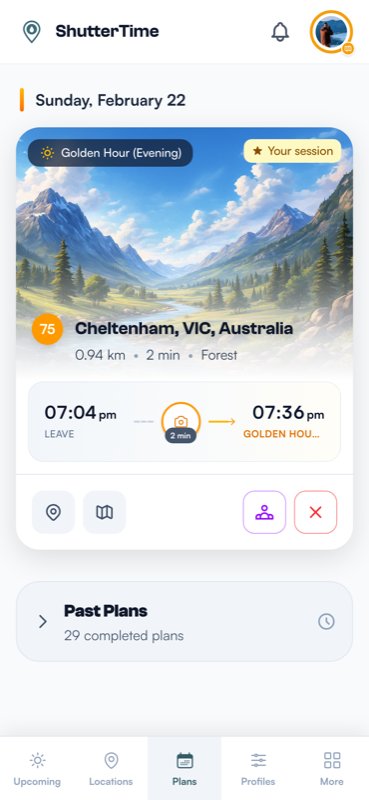
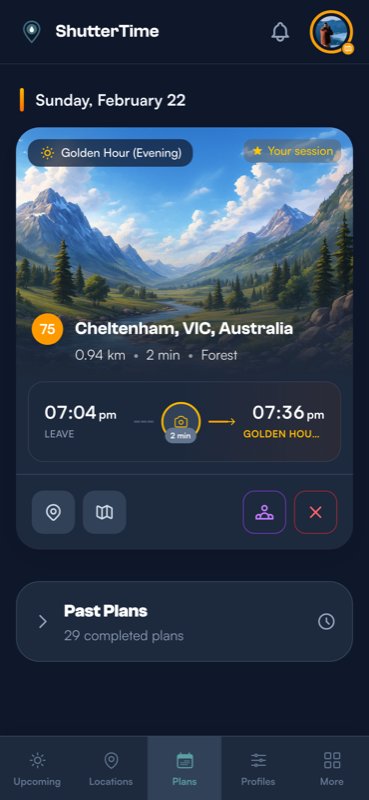
When you spot great conditions on your dashboard, you can turn an opportunity into a Plan. Plans are scheduled photo sessions that help you stay organised and never miss a shot.
Each plan shows:
- The sun phase you're targeting (e.g., Golden Hour Evening)
- Your departure time — calculated from your home base so you arrive with time to spare
- The location and current condition score
You can also set reminders to get a push notification before it's time to leave. Plans even support Live Activities on iOS 16.1+, so you'll see a real-time countdown right on your Lock Screen and Dynamic Island as your session approaches.
Discover the Community
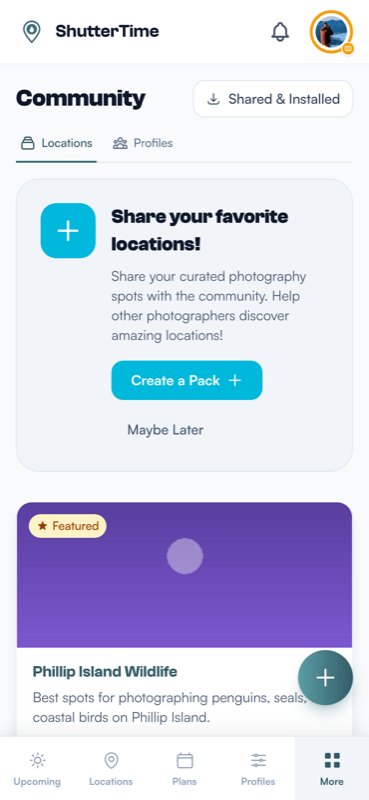
ShutterTime isn't just a solo tool — it's a community of photographers helping each other find amazing spots. The Community section (found under the More tab) lets you:
- Browse location packs — curated collections of photography spots shared by fellow photographers
- Browse shared profiles — discover new photography styles and condition preferences from the community
- Share your own — package up your favourite locations or profiles and give back to the community
Featured packs from experienced local photographers are highlighted at the top, making it easy to find trusted recommendations for your area.
Widgets and Live Activities
One of the best things about the ShutterTime iOS app is how deeply it integrates with iOS. You can add Home Screen widgets and Lock Screen widgets to keep an eye on conditions without even opening the app.
ShutterTime offers two widget types:
- Opportunities Widget — shows your next best photography opportunities with scores, times, and locations. Available in small, medium, and large sizes.
- Plans Widget — shows your upcoming planned sessions with countdown timers and weather updates.
To add a widget, long-press your Home Screen, tap the + button, search for ShutterTime, and choose the size that works for you.
For Lock Screen widgets, head to your Lock Screen settings and add ShutterTime to the widget area below the clock. You'll get a quick glance at your next opportunity score or plan countdown right from your Lock Screen.
If you're on iOS 16.1 or later, Live Activities take things even further. When a plan is coming up, you'll see a persistent, real-time update on your Lock Screen and in the Dynamic Island showing your departure countdown and weather conditions.
Dark Mode — Easy on the Eyes
If you've been scrolling through the screenshots above and thinking "this looks great, but I shoot at night and bright screens hurt my eyes" — we've got you covered. ShutterTime fully supports dark mode, and it looks absolutely stunning.
The app automatically follows your iPhone's system appearance setting. If you have dark mode enabled in iOS Settings (or scheduled to turn on at sunset — a photographer's favourite), ShutterTime switches to a rich dark theme built on deep slate backgrounds with teal accents.
Your dashboard feels right at home in the dark. Opportunity cards pop against the deep background, and the colour-coded scores — green, teal, amber — remain crystal clear and easy to read at a glance.
Location cards look particularly gorgeous in dark mode. Cover photos stand out beautifully against the dark surface, and the Around Me banner picks up a subtle teal-to-coral gradient that's easy to spot without being distracting.
Location details, maps, and the Auto-Watch feature all adapt seamlessly. The interface keeps its structure and readability while being much gentler on your eyes during early-morning or late-night planning sessions.
And when you're reviewing your plans, the dark theme makes the session card feel cinematic — the landscape photo, departure time, and golden hour countdown all stay perfectly legible.
To switch between light and dark mode, just head to your iPhone's Settings > Display & Brightness and choose your preference. ShutterTime will follow along automatically — no in-app setting needed.
What's Next?
You're all set to start finding the perfect moments to capture! Here are some ideas for where to go from here:
- Browse more tutorials for tips on profiles, scoring, and advanced features
- Explore the community to discover amazing location packs near you
- Create a custom profile tailored to your favourite photography style
- Plan your first session and let ShutterTime handle the timing
If you're an Android user — hang tight! We're working hard on bringing ShutterTime to Android, and we can't wait to welcome you soon.
Happy shooting!