Planning Your Photography Sessions
Planning Beginner
ShutterTime's Plans feature helps you schedule photography sessions at the ideal time and place. Plans track weather-driven scores that update automat...
5 min read
Published February 15, 2026
ShutterTime's Plans feature helps you schedule photography sessions at the ideal time and place. Plans track weather-driven scores that update automatically, calculate your departure time based on distance, and provide a complete day timeline so you know exactly when each astronomical phase occurs.
In this tutorial, you'll learn how to create and manage plans, read phase timelines, understand score tracking, and use the weather, tide, aurora, and night sky tabs to prepare for your session.
Your Plans at a Glance
Navigate to Plans from the top navigation bar. You'll see all your upcoming sessions grouped by date, each displayed as a rich card with key information at a glance.
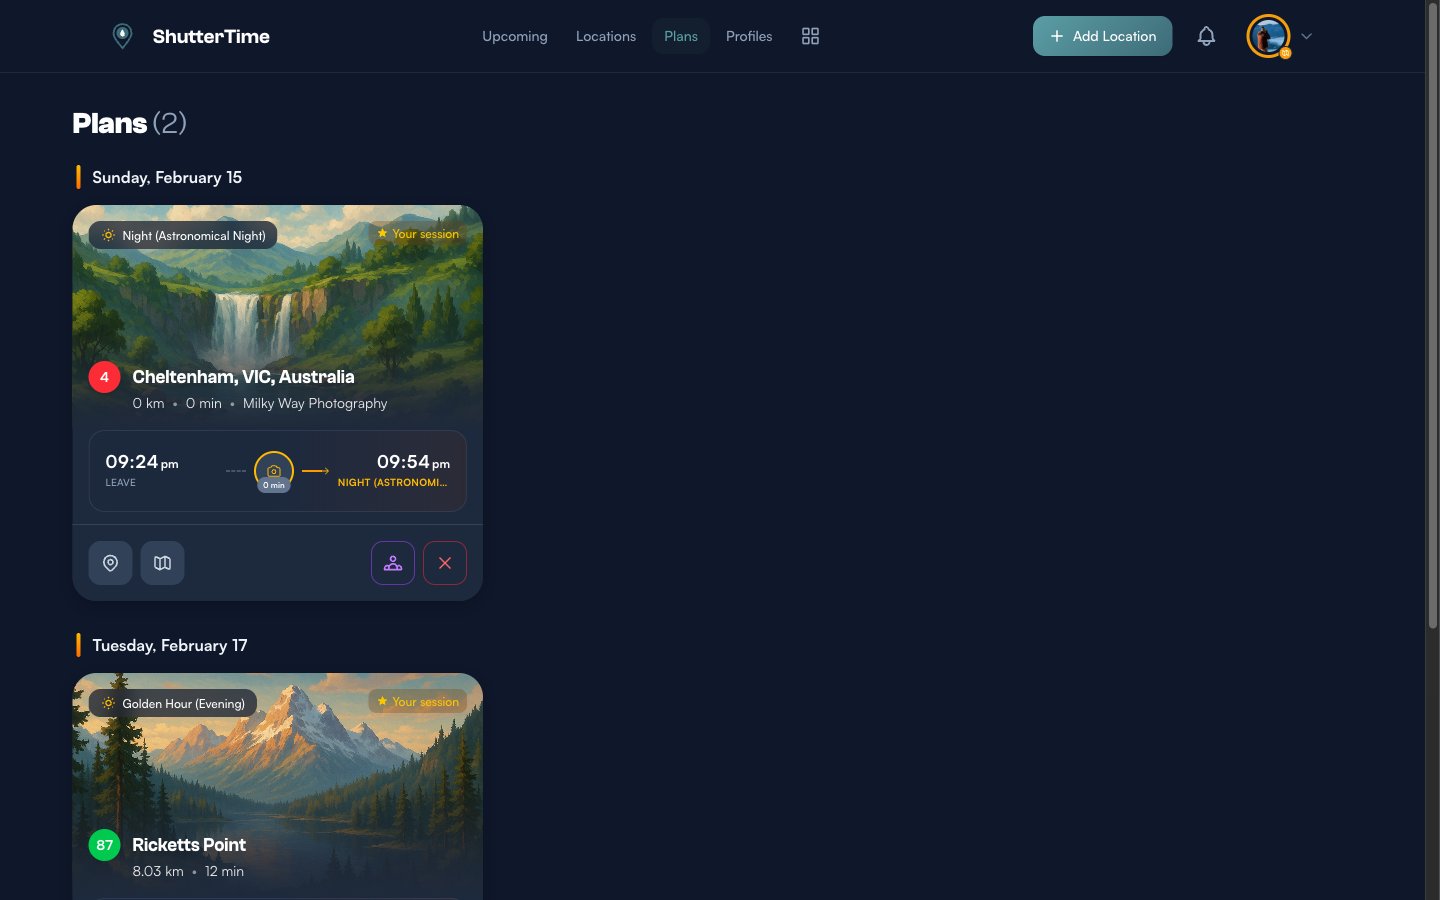
Each plan card shows:
- The phase badge in the top-left corner — this is the astronomical phase you're targeting (e.g. Golden Hour, Sunset, Blue Hour)
- A colour-coded score badge — green for 80+, amber for 60–79, or grey for lower scores
- Distance and travel time from your home location
- A timeline strip at the bottom showing your departure time, travel duration, and session start
The Timeline Strip — Departure, Travel, and Session
Every plan card includes a compact timeline strip that visualises your entire journey from door to shutter click.

The timeline reads left to right:
- Leave — your suggested departure time, calculated as the session start minus travel time minus a 30-minute buffer for parking and setup
- Travel icon with duration — how long the drive takes from your home location
- Session time and phase name — when the astronomical phase begins at your location
If you haven't set a home location in your account settings, travel time won't appear. Head to Account Settings to add one.
Understanding the Phase Timeline
Tap the timeline strip on any plan to expand the full day timeline. This shows all 16 astronomical phases for that day at your location, organised into six groups: Dawn, Sunrise & Golden Hour, Daytime, Golden Hour & Sunset, Dusk, and Night.

Your planned phase is highlighted with an orange marker and a Your Session badge. This makes it easy to see how your session fits into the broader light cycle and helps you decide whether to arrive earlier or stay later.
Key phases for photographers:
- Blue Hour — the cool, diffused light just before sunrise or after sunset. Great for cityscapes and moody seascapes.
- Golden Hour — warm, directional light right around sunrise and sunset. The most popular time for landscape and portrait photography.
- Civil Twilight — still enough ambient light for handheld shots, but artificial lights begin to glow.
- Astronomical Night — true darkness for astrophotography and Milky Way shots.
Departure Alarm
Below the plan card, you'll see the Departure Alarm section. On the ShutterTime mobile app, you can toggle a native alarm that wakes you at your suggested departure time — so you never miss golden hour.
The alarm defaults to your calculated departure time (session start minus travel minus 30-minute buffer). On iOS, ShutterTime uses AlarmKit to set a reliable in-app alarm that works even when the app is closed.
On the web version, you'll see a Get App link that takes you to the App Store to download ShutterTime for full alarm support.
ShutterTime also sends email reminders 24 hours and 6 hours before your session by default. You can customise these intervals in your notification settings.
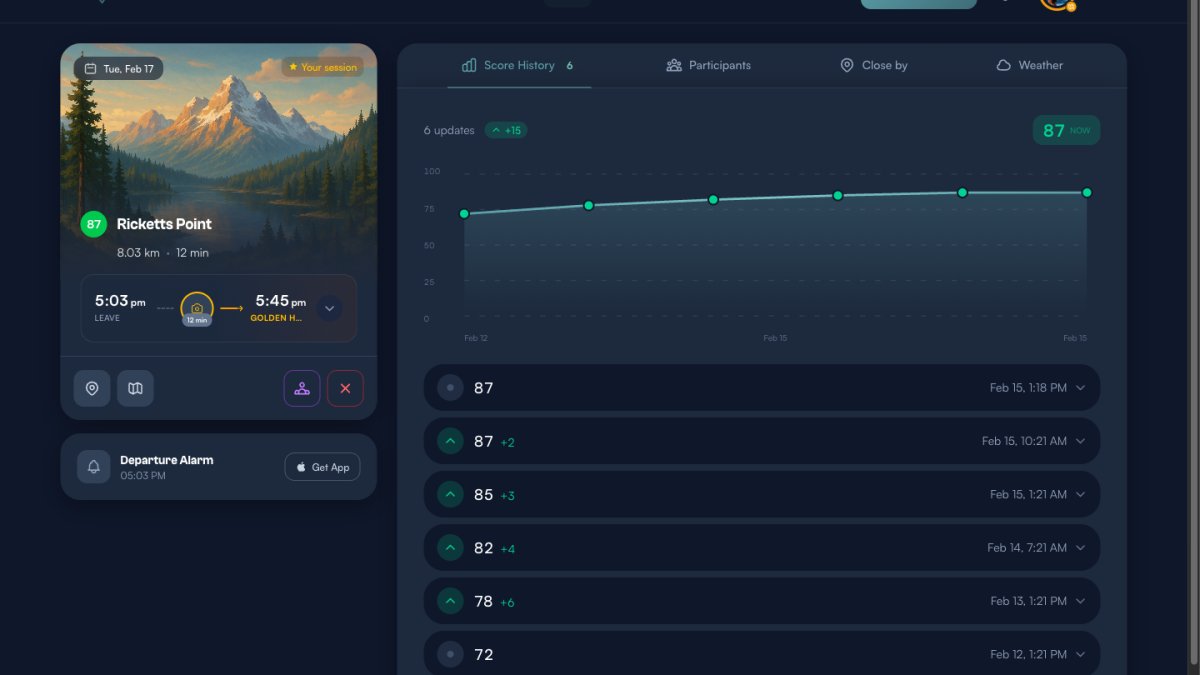
Tracking Score Changes Over Time
One of the most powerful features of plans is score tracking. When you create a plan, ShutterTime records the initial score and then monitors it as weather forecasts update.
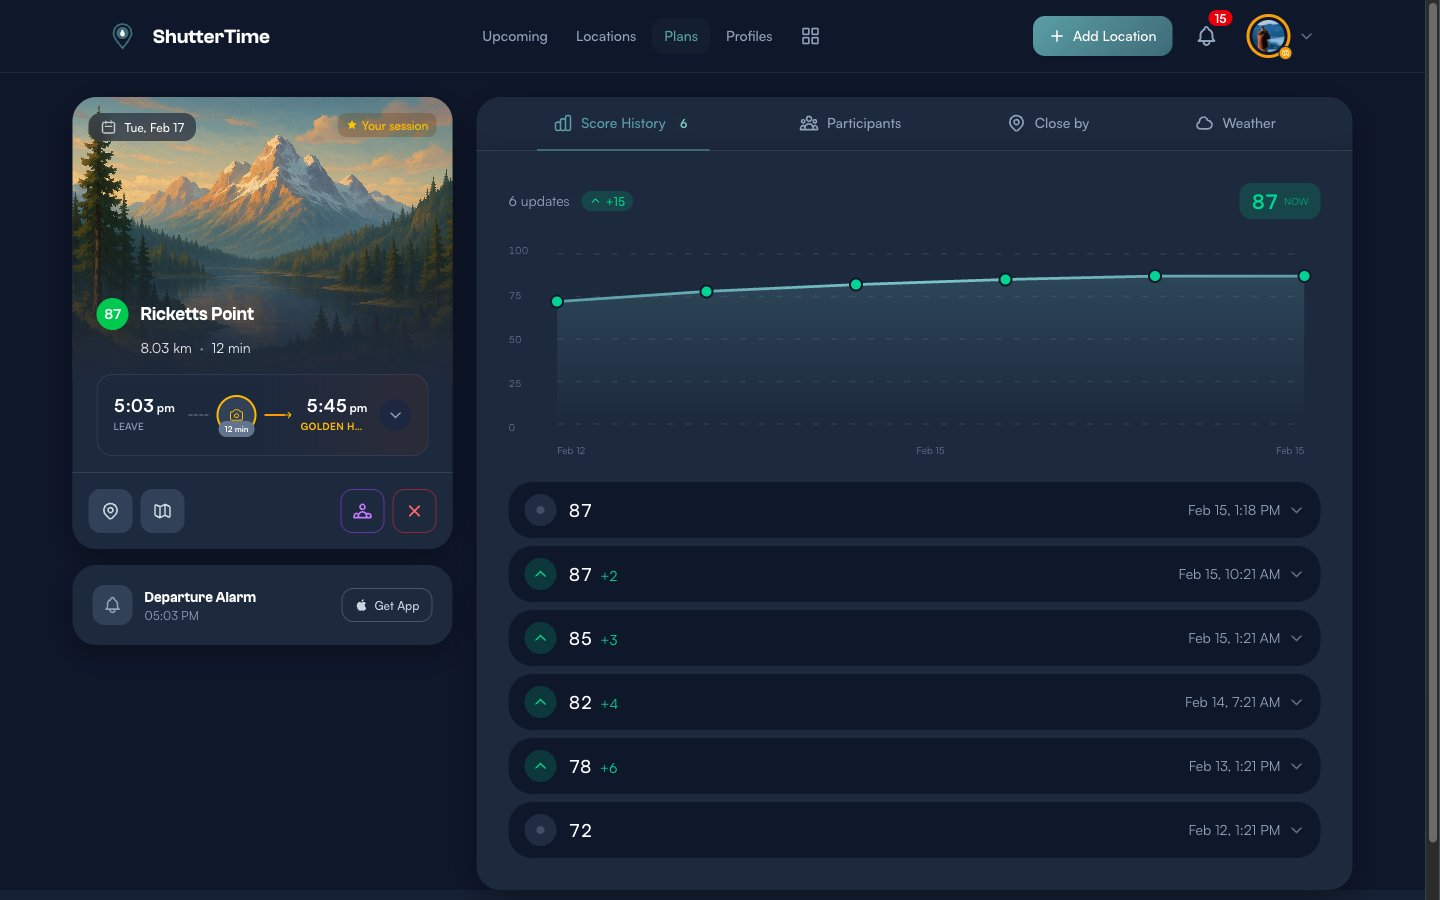
The Score History tab shows:
- A trend chart plotting score changes over time
- The total score change since creation (shown as a green +15 badge in this example)
- Individual update entries — each one shows the new score, the change amount, and when it was recorded
Tap any entry to expand it and see exactly what changed.
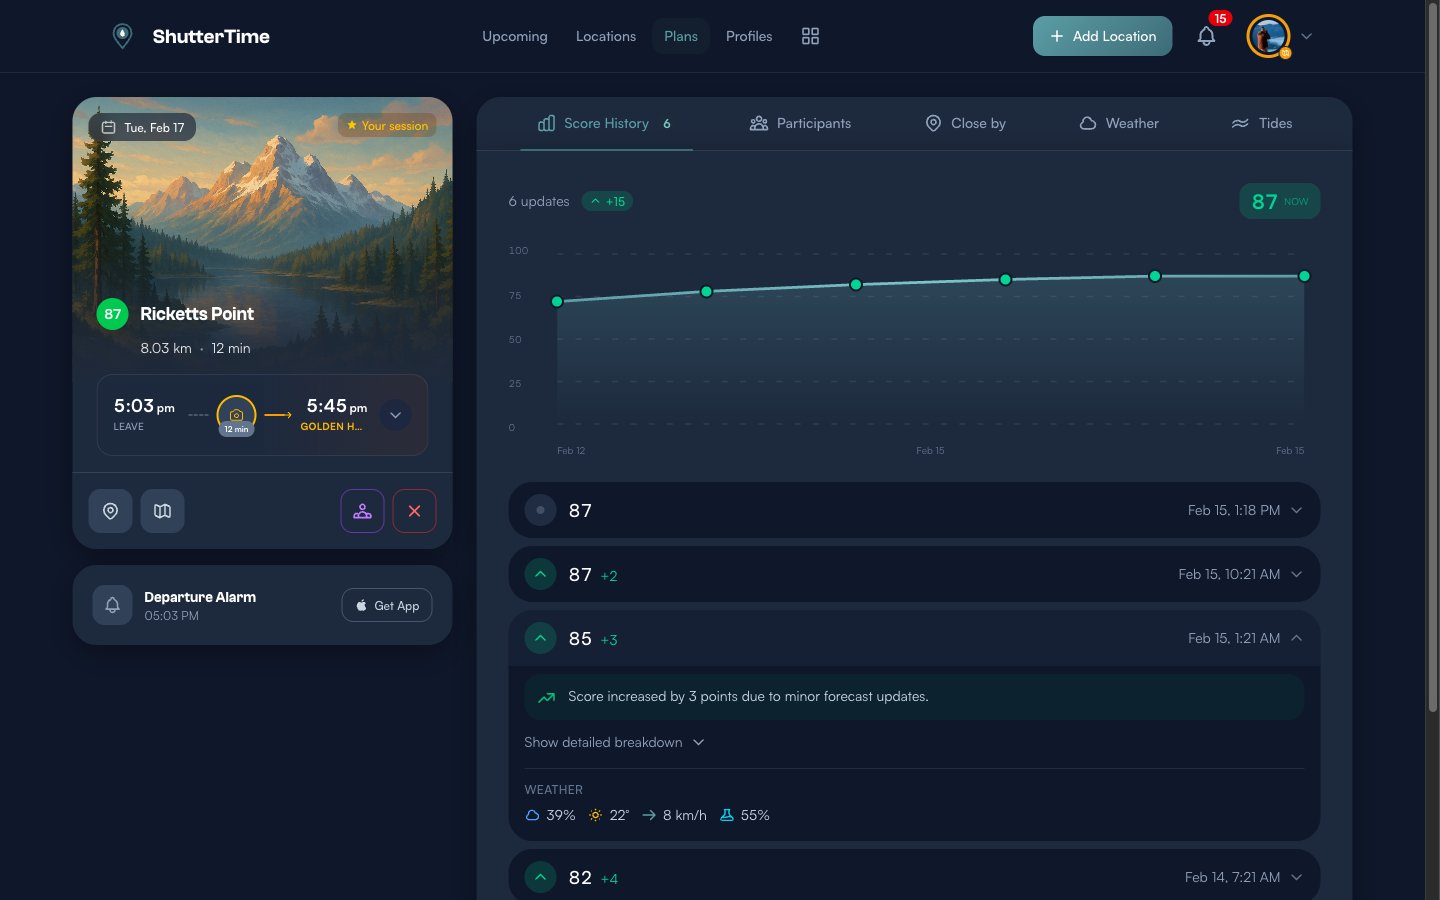
The expanded view includes:
- A natural language explanation of what drove the change — for example, reduced cloud cover or calmer wind
- Weather conditions at the time of the update — cloud cover, temperature, wind speed, and humidity
- An optional detailed breakdown button that shows condition-by-condition scores
This helps you make informed decisions — if scores are trending down, you might look for alternative locations or reschedule.
Checking Weather Around Your Session
The Weather tab shows a detailed forecast table centred around your planned time.
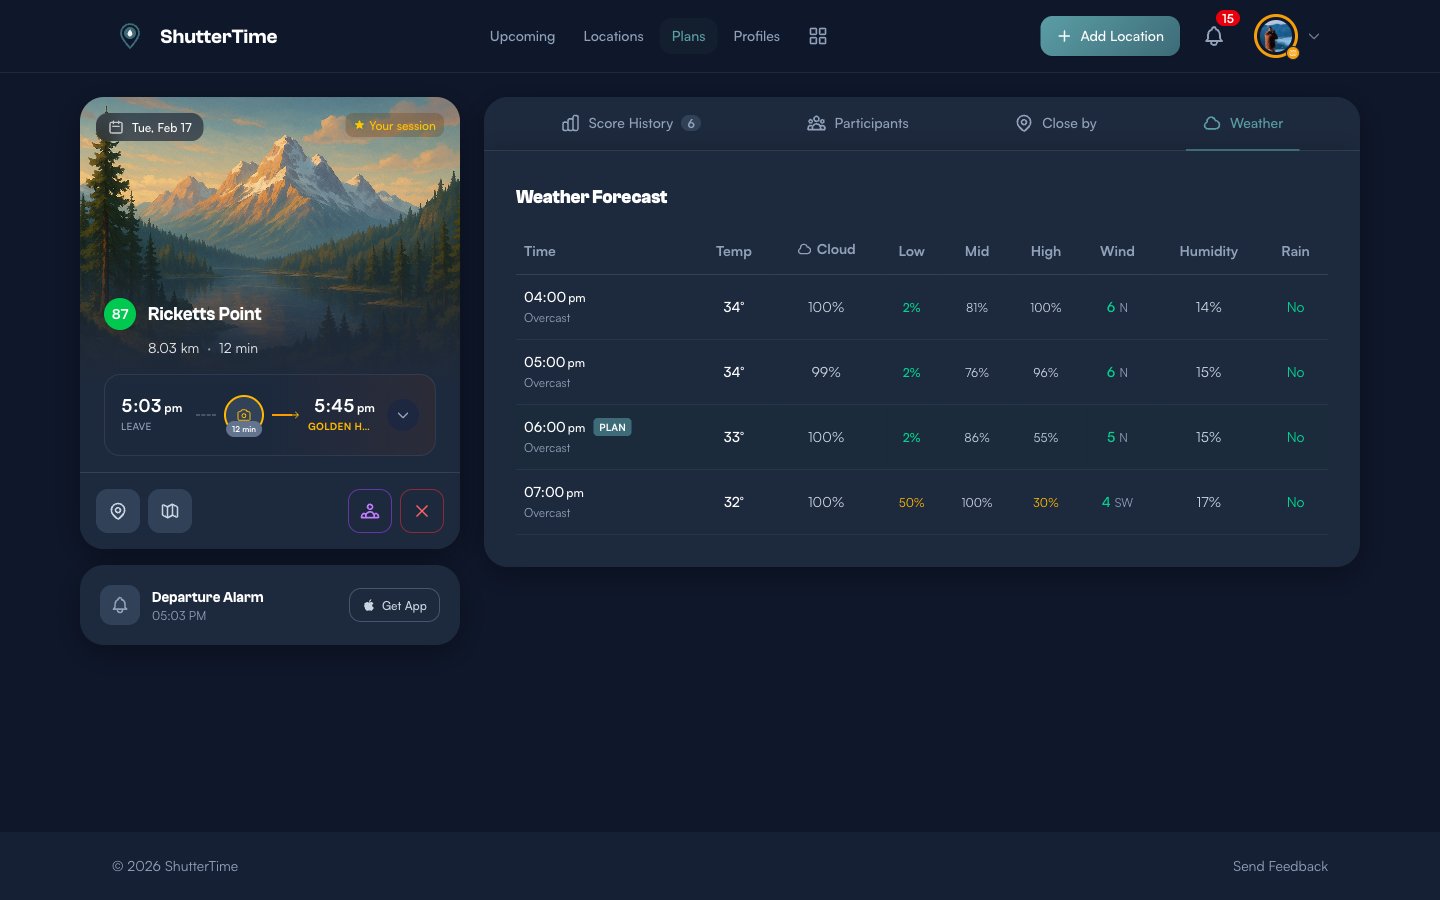
The table includes hourly data for temperature, overall cloud cover, low/mid/high cloud layers, wind speed and direction, humidity, and rain probability. The row closest to your session time is marked with a PLAN badge so you can quickly spot the conditions you'll be shooting in.
Pay special attention to the low cloud and high cloud columns — low cloud tends to block light, while high cloud can create dramatic colours during golden hour.
Tide Data for Coastal Locations
If your location has tide-related photography profiles, a Tides tab appears with a 24-hour tide chart.
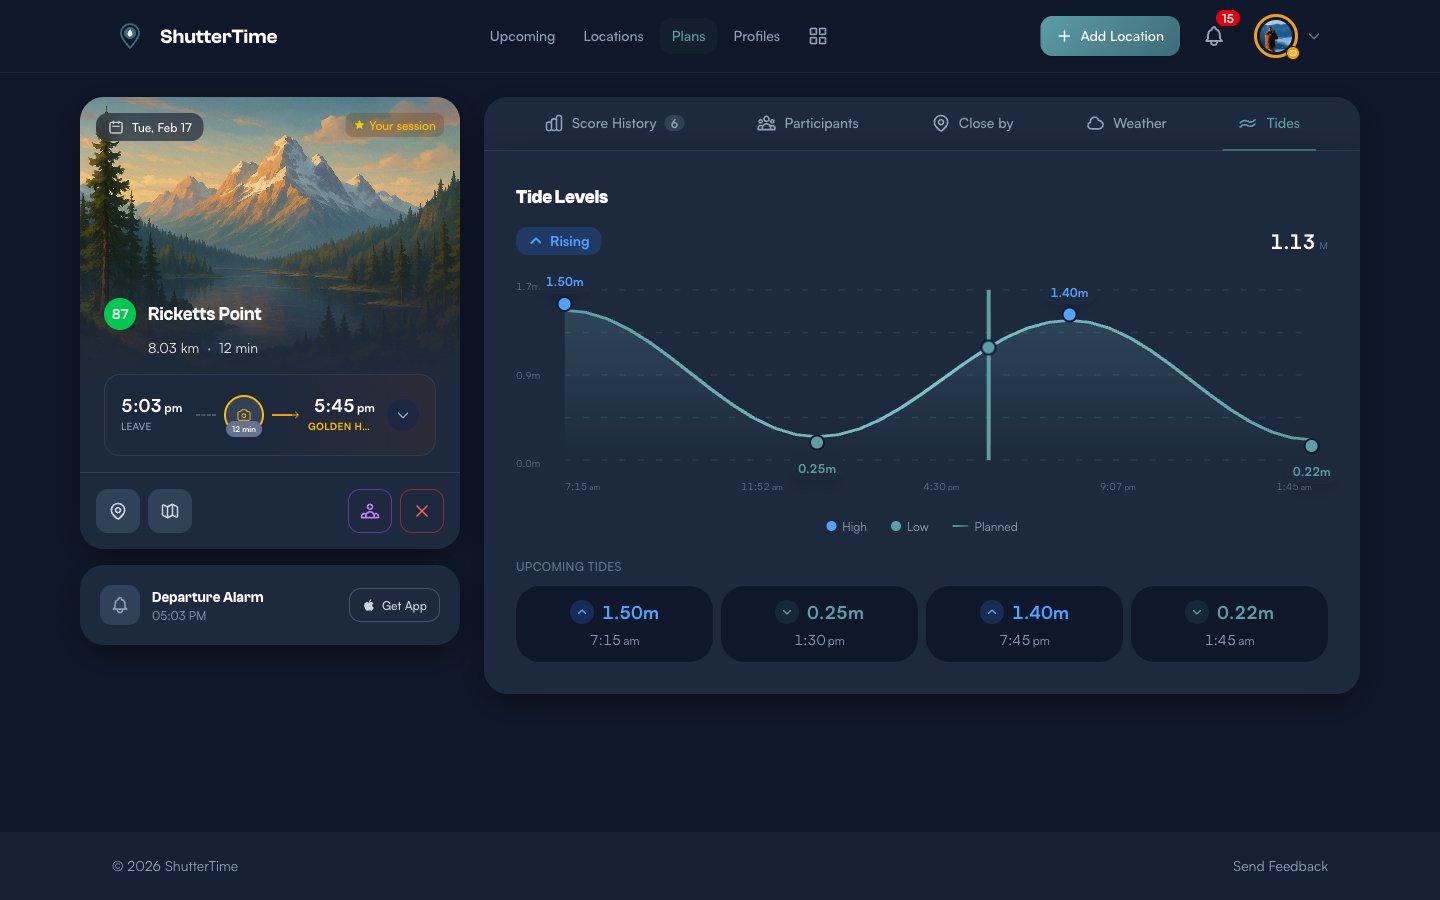
The tide chart shows:
- A smooth tide curve with blue dots marking high tides and green dots marking low tides
- A vertical line indicating your planned session time — so you can see whether the tide will be rising or falling when you arrive
- A Rising/Falling indicator with the current tide height
- Upcoming Tides cards showing the next high and low tide times and heights
Tides are critical for coastal photography — low tide exposes rock pools and textures, while high tide can create dramatic wave action. Knowing the tide state during your session helps you plan compositions in advance.
Aurora Forecast for Aurora Plans
If your plan uses a profile with aurora conditions, an Aurora tab appears alongside the other plan tabs. This gives you a dedicated aurora forecast centred around your session time.
The Aurora tab shows:
- KP Index at Plan Time — the predicted geomagnetic activity level at your session. Higher KP means stronger aurora visibility.
- Status — a human-readable label like "Quiet", "Unsettled", "Active", or "Storm" based on the KP value
- NOAA Scale — the geomagnetic storm scale (G0 to G5) that indicates how far south the aurora may be visible
- Timeline chart — an interactive KP forecast chart showing predicted geomagnetic activity over several hours, with your plan time highlighted so you can see whether conditions are improving or declining
The chart also incorporates sunrise/sunset data — since aurora is only visible during darkness, the timeline is filtered from 3 hours before your session until sunrise, helping you focus on the window that matters.
Night Sky for Astrophotography Plans
Plans that include Milky Way or Galactic Core conditions display a Night Sky tab. This tab provides an interactive sky map and timeline to help you plan your astrophotography session.
The Night Sky tab includes:
- Interactive sky map — a satellite view centred on your location showing the Galactic Core position and Moon location with directional rays, so you can visualise where to point your camera and where moonlight interference might occur
- Time slider — scrub through the night to see how the Galactic Core and Moon move across the sky at your location. This helps you pick the optimal window when the core is high and the Moon is below the horizon.
- Sky conditions card — key data about Galactic Core altitude, azimuth, rise/set times, Moon phase, and illumination at your planned time
Combining these tools lets you plan not just when to shoot but where to aim — critical for compositions that include the Milky Way arc or Galactic Core.
What's Next?
Now that you understand plans, here are some related features to explore:
- Photography Profiles — create custom profiles that define the conditions you're looking for, which directly influence your plan scores
- Locations — add more locations to your collection to discover opportunities across different spots
- Collaboration — invite other photographers to join your plan using the collaborator button on any plan card
- Close By alternatives — check the Close By tab on any plan to discover nearby locations with similar profiles that might have better conditions