Your Locations — Exploring and Managing Photography Spots
Getting-started Beginner
Your Photography CollectionThe Locations page is your personal library of photography spots. Every location you save — from nearby beaches to remote n...
11 min read
Published February 15, 2026
Your Photography Collection
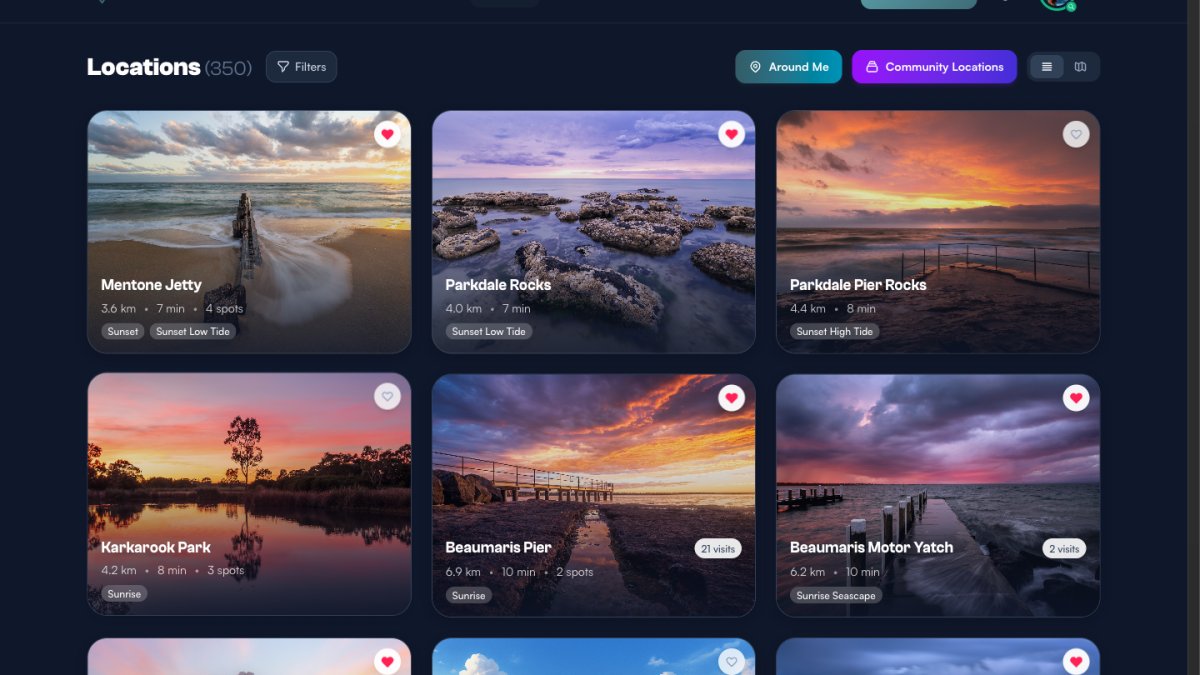
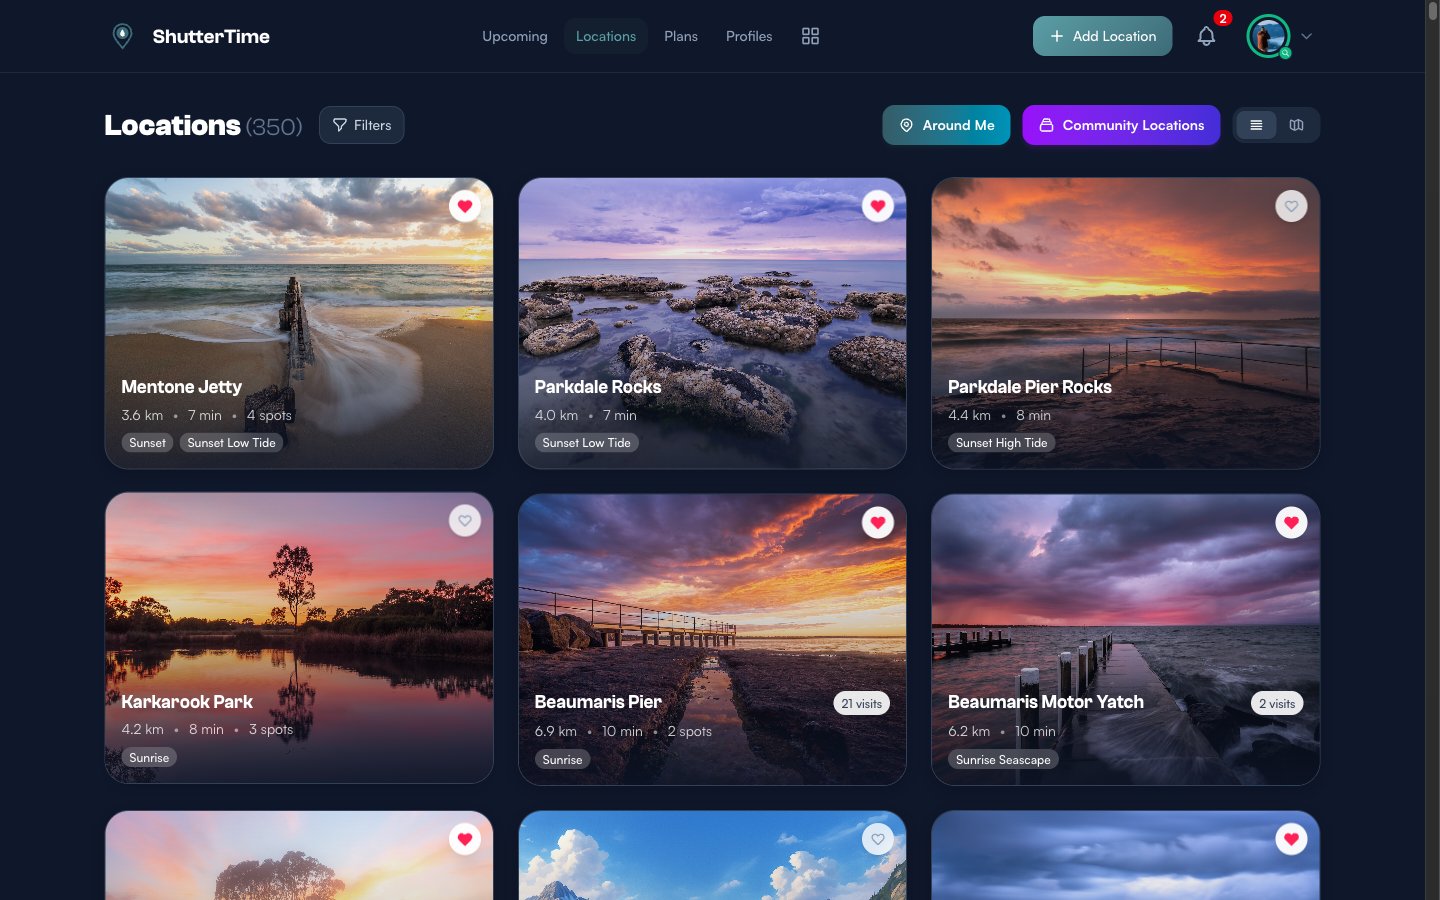
The Locations page is your personal library of photography spots. Every location you save — from nearby beaches to remote national parks — appears here as a visual card with key details at a glance. ShutterTime sorts your locations by travel time from your home base, so the closest spots always appear first.
You can reach the Locations page at any time by clicking Locations in the navigation bar at the top of the screen.
What's on a Location Card
Each location card packs a lot of information into a compact space:
- Hero image — A full-width photograph of the location. You can replace this with your own photo from the location detail page.
- Location name — The name you gave this spot when you saved it. Click the card to open the full detail page.
- Distance and travel time — How far the location is from your home base and the estimated driving time (e.g. "3.6 km • 7 min").
- Profile badges — Small labels at the bottom showing which photography profiles are attached to this location (e.g. "Sunset", "Sunset Low Tide", "Milkyway"). These determine what kind of conditions ShutterTime scores for this spot.
- Favourite heart — A heart icon in the top-right corner. Red means favourited, grey means not. Click it to toggle.
- Visit count — If you have recorded visits to this location, a badge shows the number (e.g. "21 visits").
- Spots count — If you have saved specific shooting spots within this location, it appears as a count (e.g. "4 spots").
- Community badge — If the location came from a community pack, a small avatar and pack name appear on the card showing who shared it.
Favouriting Locations
Favouriting is the quickest way to organise your collection. Click the heart icon on any card to mark a location as a favourite. Favourited locations show a red filled heart, while non-favourites show a grey outline.
You can then use the Favourites filter to quickly find your top spots. This is especially useful when you have a large collection — favourite your go-to locations and filter down to just those when planning a shoot.
Filtering Your Locations
Click the Filters button next to the "Locations" heading to reveal the filter panel. This gives you precise control over which locations appear:
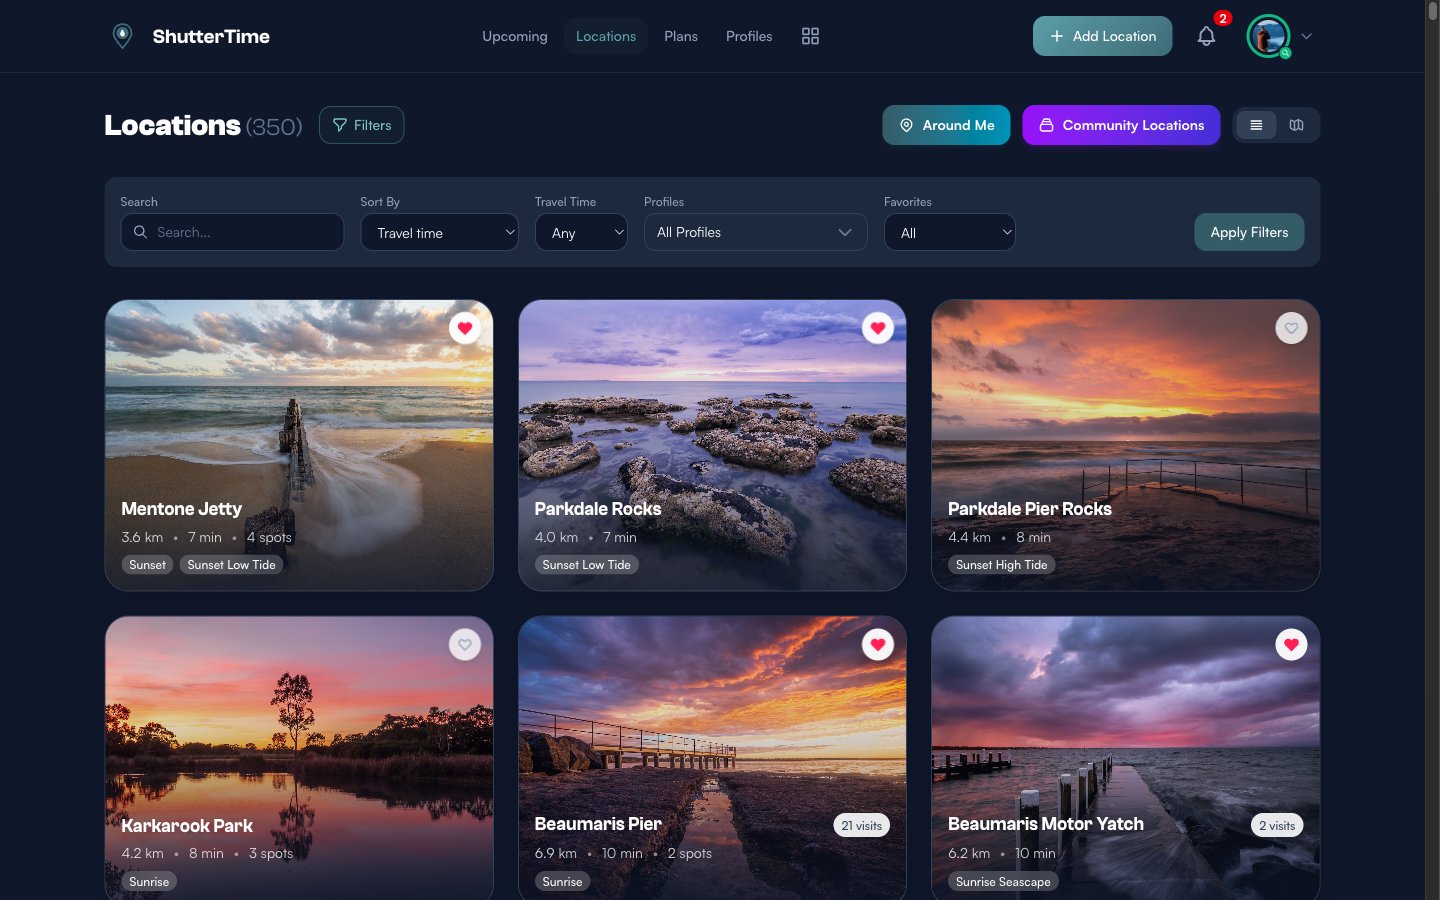
- Search — Type a location name to instantly filter results. Useful when you remember the spot but do not want to scroll through hundreds of cards.
- Sort By — Choose how locations are ordered: by travel time (default), distance, name A-Z, recently added, or recently favourited.
- Travel Time — Limit results to locations within a maximum driving time — 30 minutes, 1 hour, 2 hours, and so on. Set to "Any" to see everything.
- Profiles — Narrow results to locations that have a specific photography profile attached. Choose "All Profiles" to see everything, or select a single profile like "Sunset" or "Milkyway" to filter.
- Favorites — Show all locations, only favourites, or only non-favourites.
Click Apply Filters to update the results. An active filter count badge appears next to the Filters button so you always know when filters are applied. Click Clear all to reset everything.
Switching to Map View
In the top-right corner of the Locations page you will see two small toggle buttons — a list icon and a map icon. Click the map icon to switch to map view.

Map view displays all your locations as coloured markers on a satellite map. The markers use different colours to distinguish your own private locations from community locations. Sunrise and sunset direction lines radiate from your home location, helping you visualise how the sun moves relative to your photography spots throughout the day.
You can interact with the map just like Google Maps — zoom, pan, and switch between satellite and terrain views. Click any marker to see a quick summary popup with the location name, score, and buttons to view the detail page or add to plan.
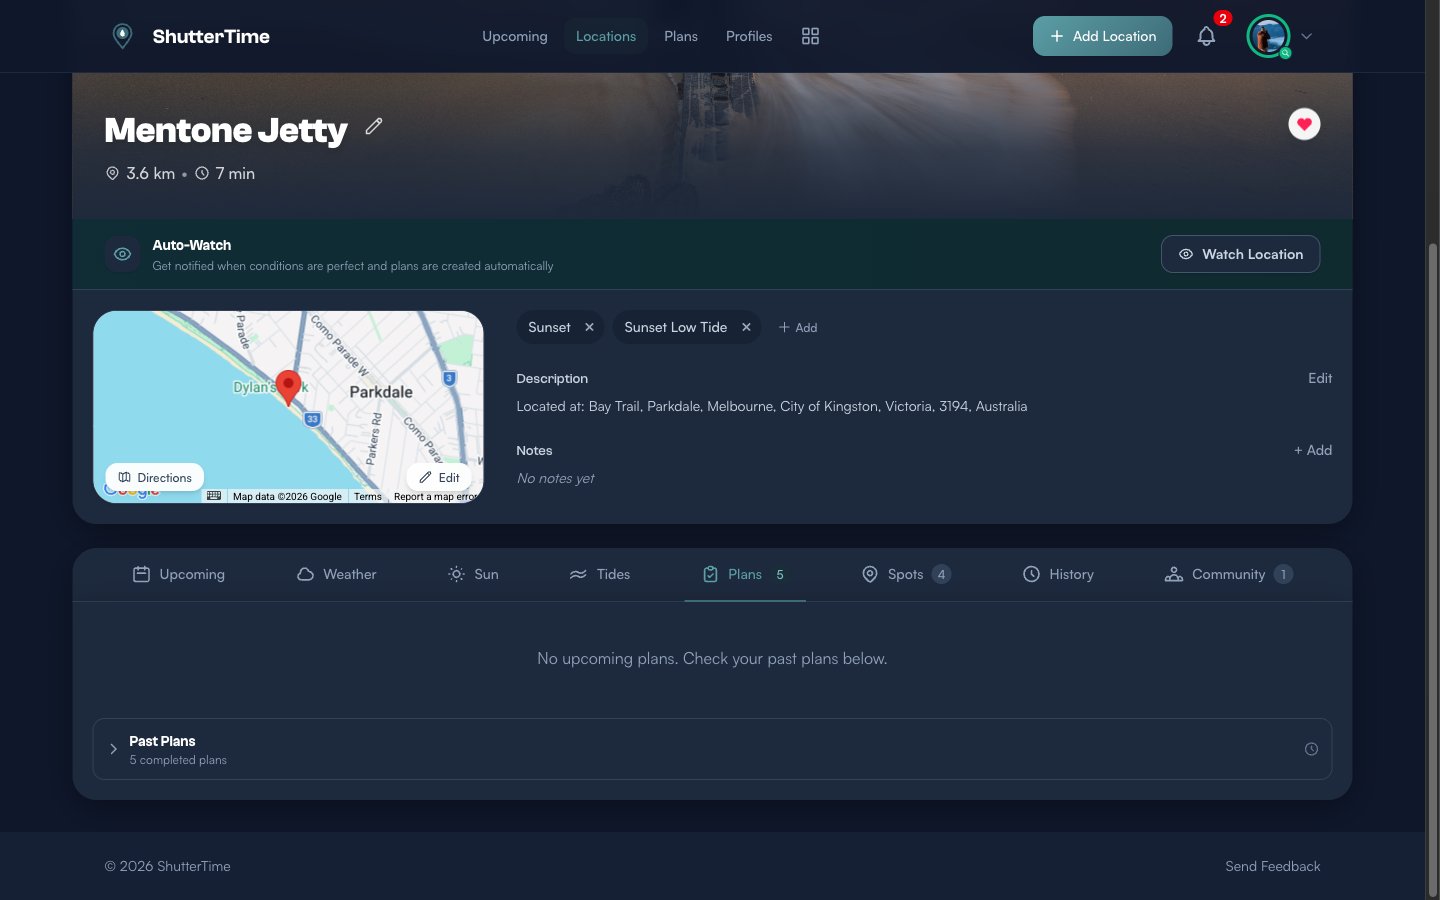
The Location Detail Page
Click any location card to open its detail page. This is where you find everything about a specific photography spot — from live weather forecasts to tide charts, sun position data, and more.
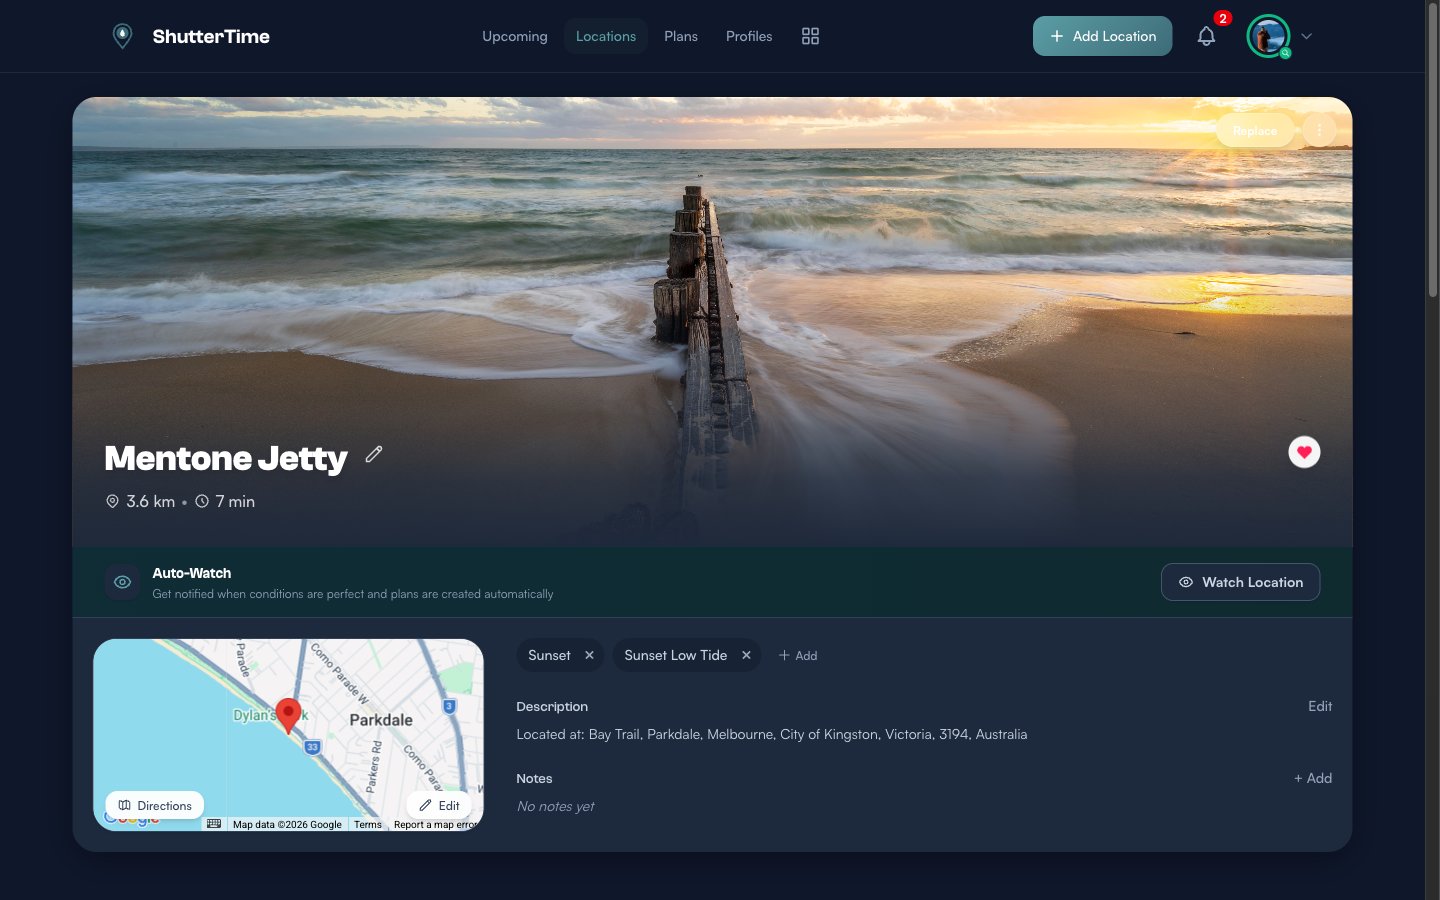
The top section of the detail page contains:
- Hero image — A large photograph of the location. Click Replace to upload your own photo.
- Location name — Click the pencil icon to rename it.
- Distance and travel time — Calculated from your home location.
- Favourite heart — Toggle this location as a favourite.
- Auto-Watch — Enable this to receive automatic notifications when conditions at this location meet your target score. Plans are also created automatically.
- Google Map — A small interactive map with the location marker. Click Directions to open Google Maps navigation, or Edit to adjust the pin position.
- Attached profiles — The photography profiles assigned to this location (e.g. Sunset, Sunset Low Tide). Click the X to remove a profile, or + Add to attach a new one.
- Description — Auto-generated address. Click Edit to write your own.
- Notes — Personal notes about the spot. Click + Add to start writing.
Location Tabs
Below the overview section you will find a row of tabs. The available tabs depend on the profiles attached to this location — for example, the Tides tab only appears when a tide-based profile is attached, and the Night Sky tab only appears when a Milky Way profile is present.
Here is what each tab shows:
Upcoming Tab
The default tab. It displays a 7-day forecast of scored opportunity cards for this location, grouped by day. Each card shows the phase (e.g. Sunset), time, profile name, conditions summary (cloud cover, wind, temperature, tide), and a colour-coded score. You can click Plan to schedule a visit or Expand to see the full conditions breakdown.
Weather Tab
An hourly weather forecast table for the next three days.

The table includes columns for time, weather icon and description, temperature, overall cloud cover, high/mid/low cloud layers, wind speed with direction arrows, rain probability, and the current astronomical phase (Daytime, Midday, Golden Hour, Sunset, Nautical Twilight, Night). Switch between Hourly and Daily views, and click Today, Tomorrow, or a day name to jump between days. A summary card at the top shows current conditions at a glance.
Sun Tab
A visual sun position tool showing exactly where the sun rises and sets relative to your location.
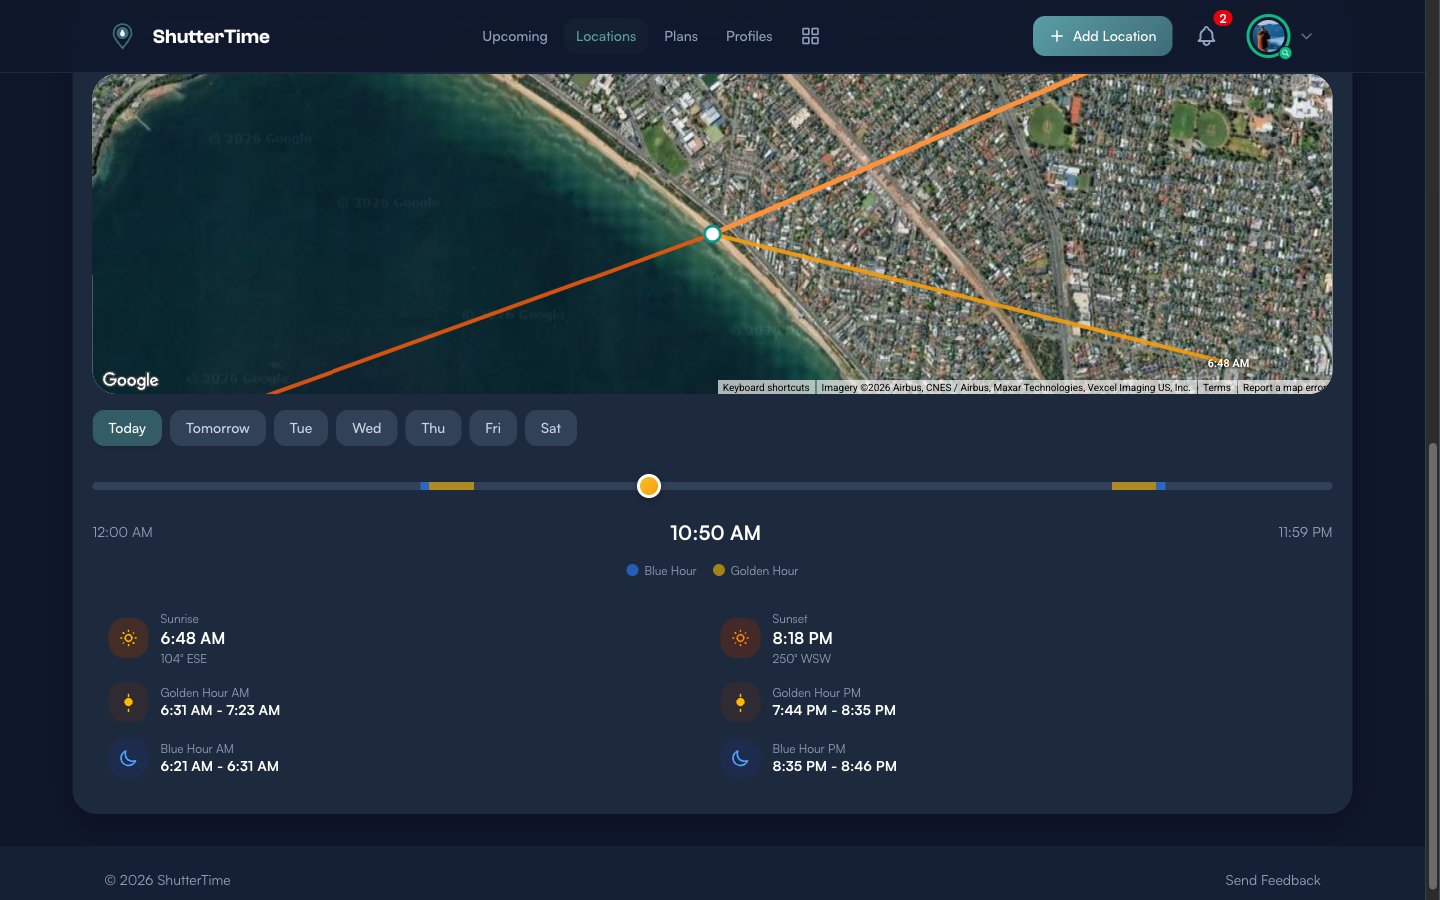
The satellite map displays directional lines — the orange line shows the sunrise direction and a second line shows the sunset direction for that day. These lines update as you switch between days using the day selector buttons.
Below the map, a timeline bar shows the full 24-hour day colour-coded by phase: day, civil twilight, nautical twilight, astronomical twilight, dark sky, and optimal shooting windows. A draggable handle lets you scrub through the day to see the sun position at any time.
Detailed cards show exact times and compass bearings for Sunrise, Sunset, Golden Hour AM/PM, and Blue Hour AM/PM.
Tides Tab
The Tides tab appears when a tide-based profile is attached to the location. It displays a smooth tide curve for the day, sourced from the nearest tidal station.
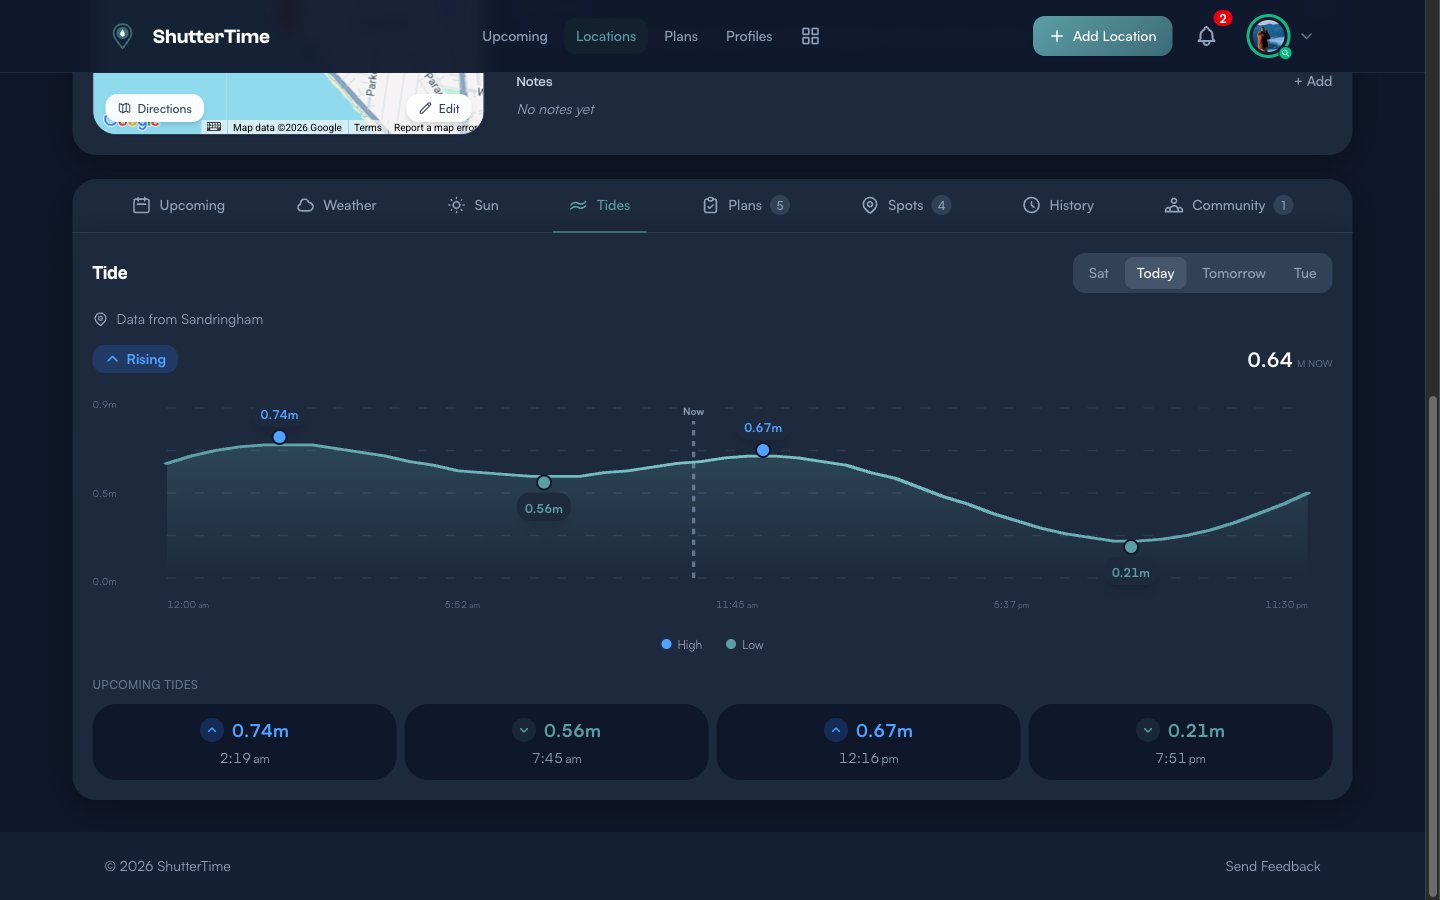
Key features of the tide chart:
- Teal tide curve — Shows the tide height over the full day with a gradient fill
- High/Low markers — Blue dots mark high tides, teal dots mark low tides, each labelled with the height in metres
- Now line — A vertical dashed line shows the current time
- Direction badge — Shows "Rising" or "Falling" with the current height
- Current height — Displayed prominently (e.g. "0.64 M NOW")
Below the chart, Upcoming Tides cards show each high and low tide for the day with exact times. Use the day selector (Sat, Today, Tomorrow, Tue) to view tides for other days. The data source station is shown at the top (e.g. "Data from Sandringham").
Night Sky Tab
The Night Sky tab appears when a Milky Way or astrophotography profile is attached. It provides everything you need to plan a night shoot.
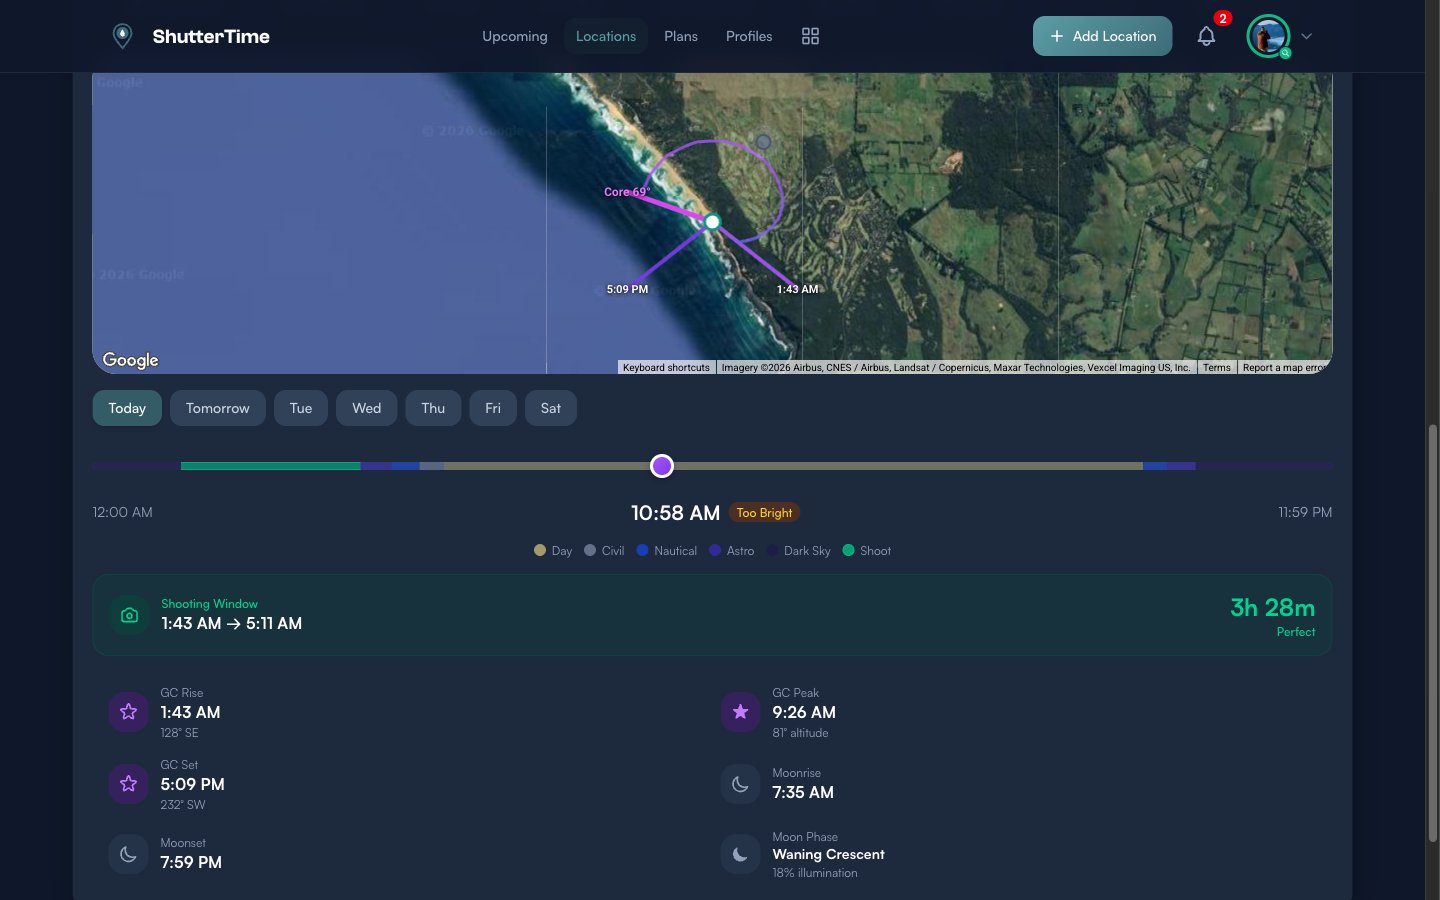
The satellite map shows the galactic center arc — a purple curve tracing the path of the Milky Way core across the sky, with rise, set, and core altitude annotations.
Below the map, a darkness timeline colour-codes the entire day into phases: Day (yellow), Civil Twilight (grey), Nautical Twilight (blue), Astronomical Twilight (purple), Dark Sky (dark), and Shoot windows (green). A status badge shows whether it is currently "Too Bright" or in a usable darkness phase.
A highlighted Shooting Window card shows when the galactic center is visible during dark hours, the total duration, and a quality rating ("Perfect" when conditions are ideal).
Detailed cards show:
- GC Rise — When the galactic center rises, with compass bearing
- GC Peak — When it reaches maximum altitude
- GC Set — When it sets, with compass bearing
- Moonrise and Moonset — Exact times
- Moon Phase — Phase name (e.g. Waning Crescent) and illumination percentage
Aurora Tab
The Aurora tab appears when an aurora-related profile is attached. It displays a colour-coded Kp index forecast showing geomagnetic activity in 3-hour time slots. The bars are coloured by intensity — grey for quiet (Kp 0-2), green for potentially visible (Kp 3-4), amber for strong (Kp 5-6), and rose for severe storms (Kp 7+). Daytime hours are overlaid with diagonal stripes so you can identify usable nighttime windows at a glance.
Plans Tab
The Plans tab shows all photography plans associated with this location — both upcoming and past.
Upcoming plans appear at the top with full details. Past plans are grouped in a collapsible Past Plans section showing the total count. Click the arrow to expand and review your shooting history at this location.
Spots Tab
Spots are specific shooting positions within a location. For example, a beach location might have separate spots for "The Rocks", "The Jetty", and "The Lifesaving Club".
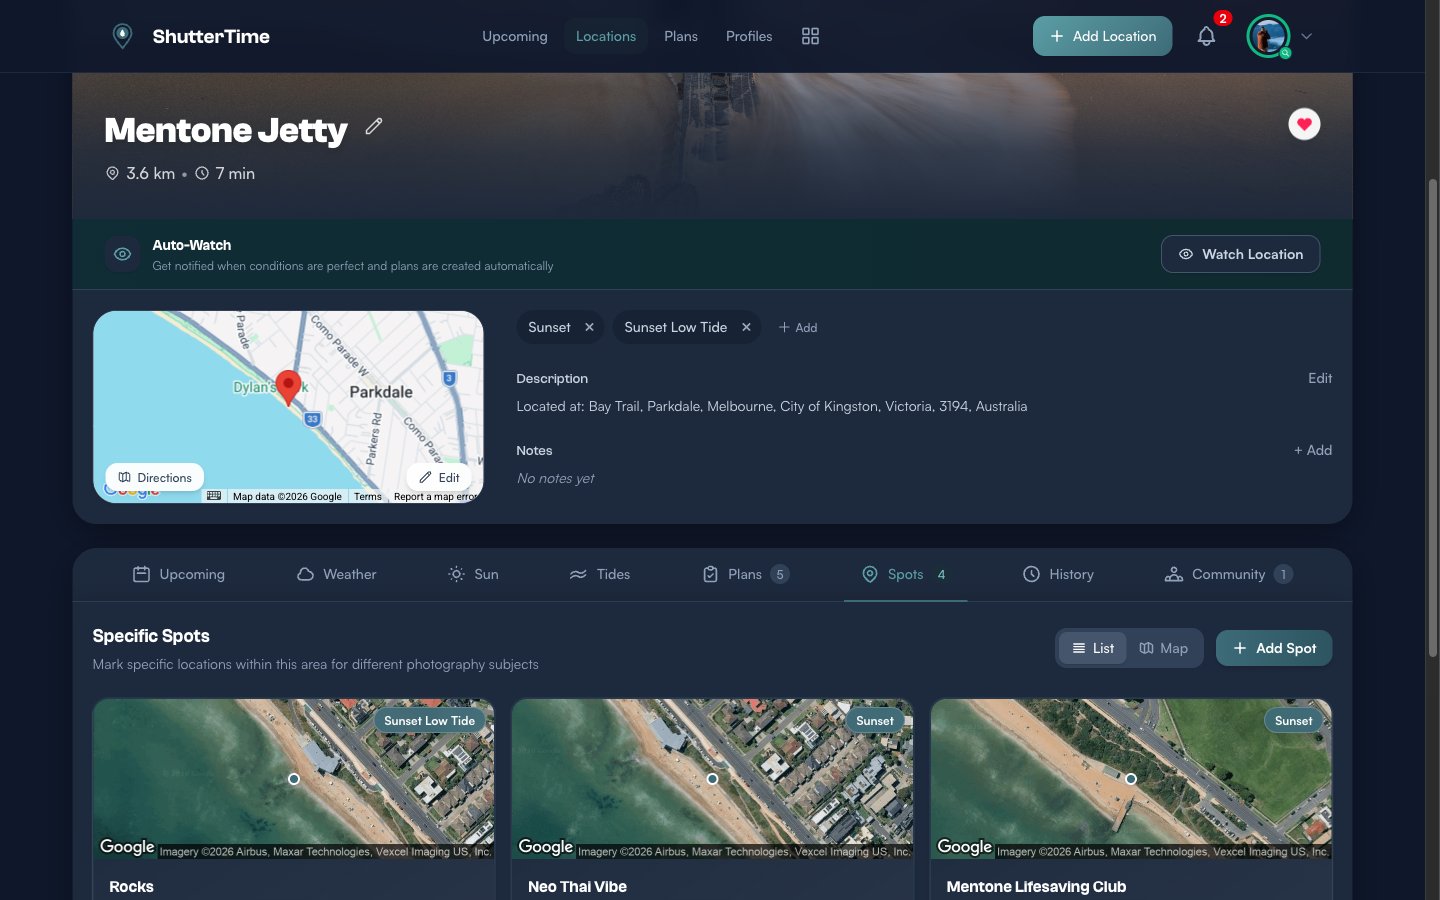
Each spot card shows a satellite map zoomed to the exact position, the assigned profile, and the spot name. Toggle between List and Map views, or click + Add Spot to mark a new shooting position.
History Tab
The History tab tracks your visits to this location. Record when you visited, what conditions were like, and what you shot. This builds a personal log that helps you identify patterns — which conditions produce your best results at each spot.

Click Add Visit to log a new visit with date, conditions notes, photos, and results.
Community Tab
The Community tab shows activity from other ShutterTime photographers who have also saved or visited this location.
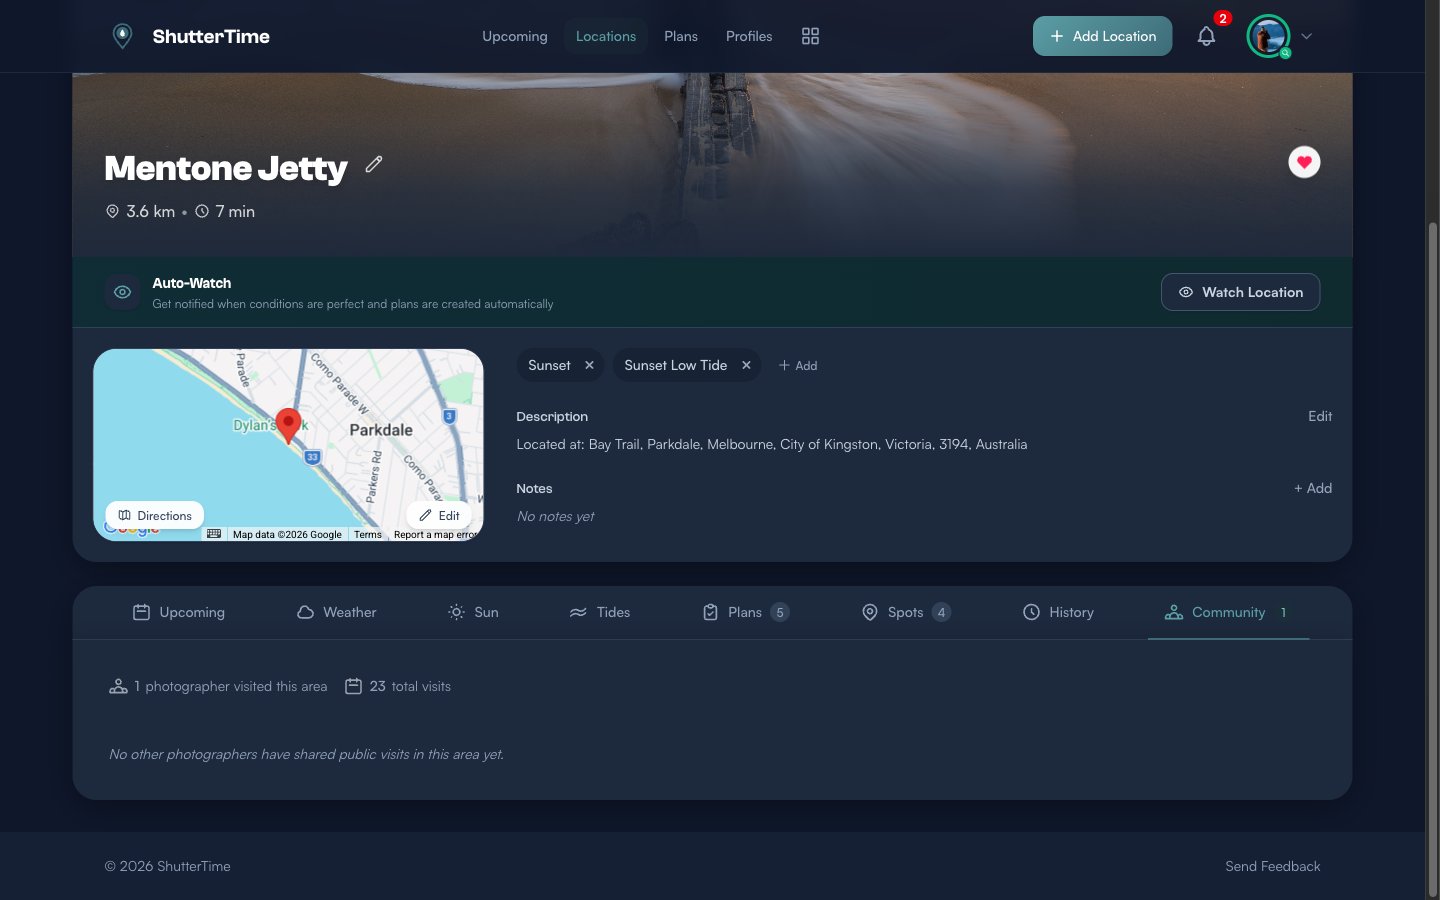
It displays how many photographers have visited the area and the total visit count across the community. When other photographers share public visits, their notes and photos appear here — giving you insight into what others have captured at this spot.
Adding a Plan from a Location
When you see an opportunity you want to commit to, click the Plan button on any opportunity card in the Upcoming tab. ShutterTime instantly creates a plan for that time window.

Once planned, the card changes — the Plan button becomes a green Planned badge and the card gets a green left border. You can also plan directly from the main Upcoming dashboard; the location detail page simply lets you focus on a single spot.
Cancelling a Plan
Changed your mind? Click the green Planned button to open the cancellation dialog.
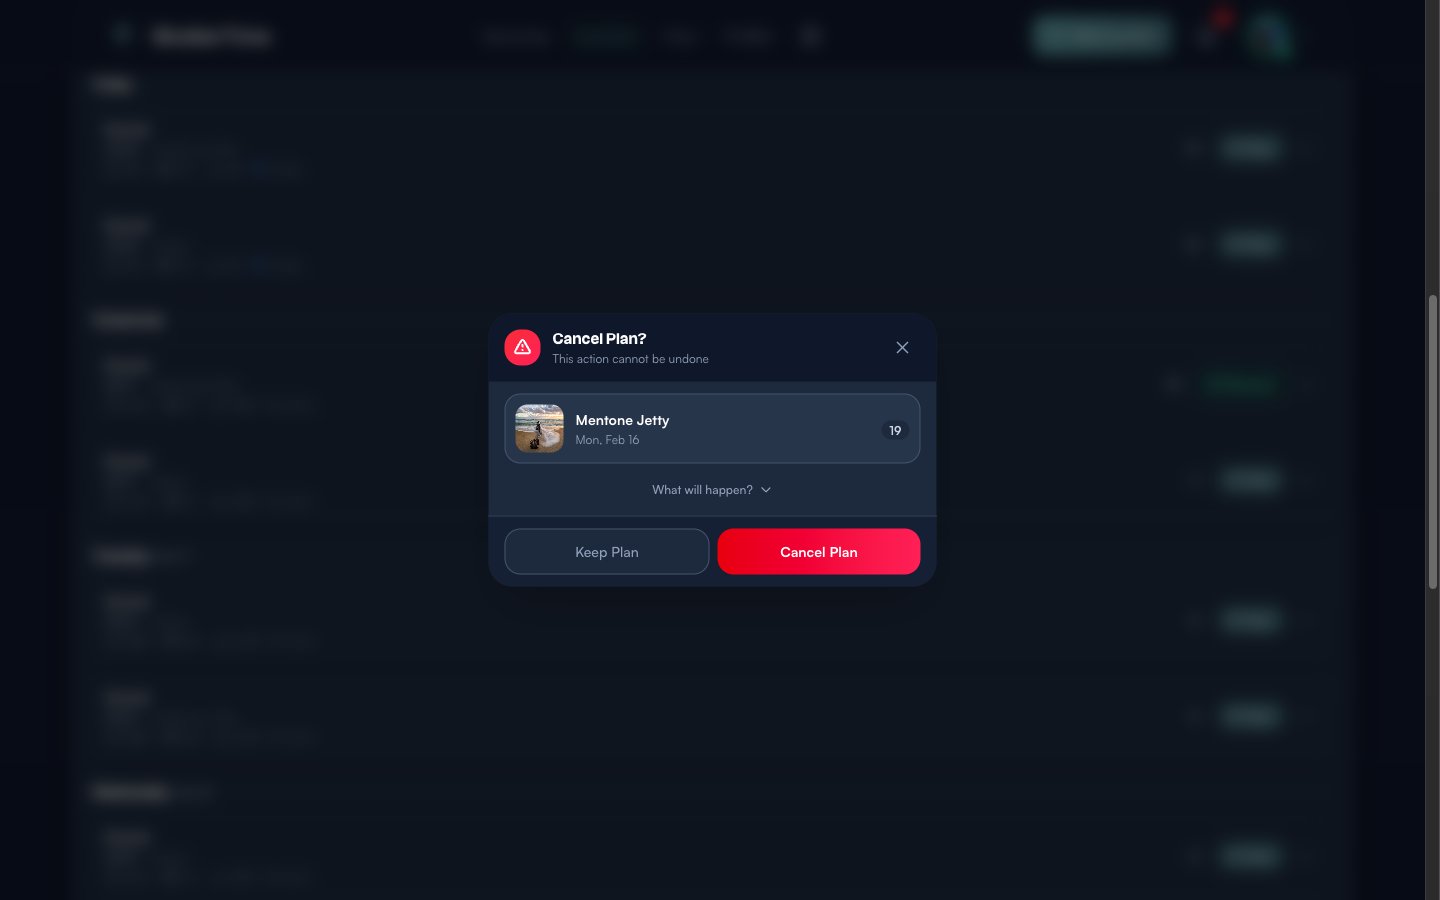
The dialog shows the location name, date, score, and a What will happen? expander. You have two options:
- Keep Plan — Dismiss the dialog and keep your plan
- Cancel Plan — Remove the plan. A toast notification confirms the removal.
Quick Links: Around Me and Community
At the top of the Locations page, two shortcut buttons sit alongside the Filters and view toggles:
- Around Me — Opens a map-centric view showing nearby locations with real-time conditions, ideal for spontaneous shooting when you want to see what is close and conditions-ready right now.
- Community Locations — Browse location packs shared by other photographers. Install a pack to add those spots to your collection with one click.
What's Next?
Now that you understand the Locations page and detail views, here are some things to explore:
- Create custom profiles — Build photography profiles that match your shooting style, then attach them to locations
- Manage your plans — Review all your upcoming plans across all locations in one place
- Browse the community — Discover and install location packs shared by other photographers
- Add a new location — Save a new photography spot to your collection